
6 Effective Ways to Keep Your Basement Dry

The persistent issue of basement moisture can be enough to make any homeowner want to pull their hair out in frustration. But not to worry! The problem, though annoying, is solvable. Your basement – that invaluable asset adding usable square footage to your home – does not need not remain a dank and damp space.
Basements, by virtue of being below ground level, are typically cooler than the outside air. This makes them a potential ground zero for condensation issues. As our homes function like chimneys, they pull new air in from lower levels and expel it through the upper levels. Unfortunately, this air exchange can sometimes bring unwanted moisture along with it.
There are numerous reasons for a basement’s moisture issue. In this guide, we’ll highlight how to spot a moisture problem in your basement and, more importantly, share practical steps you can take to mitigate these issues.
Indications of Basement Moisture
Water in your basement will leave tell-tale signs. Generally, basement moisture will cause several problem signs to arise. If you notice any of the following signs in your basement, it’s a clear indication that you’re dealing with moisture:
- Cracks along basement walls and floors
- Bowing walls
- Efflorescence
- Mold growth
- High humidity
- Damp or wet walls
- Musty smells
Unchecked humidity in your basement can be particularly dangerous. It can accelerate the growth of mildew and mold, potentially causing health issues and structural damage. But with a proactive approach, you can control the humidity in your basement, transforming it into a dry and safe space.
How to Ensure a Dry Basement
These practical steps can help you control moisture and humidity in your basement:
1. Ensure Your Yard is Graded Properly
Yard grading refers to the slope of your yard. Even flat-looking yards have a slight slope to them. This is to ensure that any water in your yard, whether it be from rain, sprinklers, or snow, drains away from your home.
Without proper grading, water will flow toward the base of your home and cause water to build up right next to your basement. Over time, this increases the chances of basement water issues like wet basement walls or leaking basement windows.

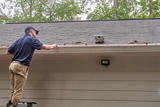
2. Update Gutters and Downspouts
While summer tends to be a warm, humid time in North Carolina, the season also brings a fair share of rain. Most homes are required to have a gutter system that captures rainwater and drains it away from your walls and foundation with downspouts.
Unfortunately, gutters and downspouts don’t last forever. If it’s been a while since your gutter system has been updated, consider getting some work done. At the very least, make sure to unclog gutters that have leaves and other debris blocking the trough.
Something else to keep in mind is the placement of your downspouts. Are they located close to your basement? Do they extend far enough to expel water away from your home? If not, consider extending your downspouts underground. Doing so is a great way to ensure that captured water truly stays away from your basement after a storm.
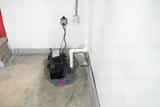
3. Install Interior Drainage and a Sump Pump
Water likes to find the path of least resistance. While you can take measures to prevent most water from getting close to your basement, there is always bound to be a little bit that makes it through. It’s always better to be safe rather than sorry when it comes to your home.
For that reason, we recommend installing a water management system in your basement such as an interior drainage system (we install BasementGutter™) and a sump pump to capture any water that might get into your basement. These systems can be connected to your main water line. This creates an efficient water removal process that keeps your basement dry even through the wettest storms!
4. Put a Vapor Barrier on the Basement Walls
Basement walls are often built with porous materials like concrete or brick. Any moisture in the soil surrounding your basement has a chance to leak through these materials. This can lead to all kinds of unpleasant issues such as efflorescence or mold.
Putting a vapor barrier along your basement walls is the best way to ensure this doesn’t happen in your basement. However, stay away from thin vapor barriers found at hardware stores. It’s best to work with a professional who can install an industry-grade vapor barrier that is durable and effective in the long term. Even better, your basement will get a slight facelift with the slick white design of a high-quality vapor barrier.

5. Reinforce Basement Walls
If water collects next to your basement for an extended amount of time, it leads to structural damage such as bowing walls or basement wall cracks. If this is happening in your basement, don’t let the problem sit—it will only get worse over time.
This type of damage contributes to water in your basement, as water can leak through cracks in the walls. If you want to prevent this type of damage, and in turn keep your basement drier, you need to install wall reinforcement.
There are a few options for this:
The specific reinforcement tool that is used depends on the specific needs of your basement. In all cases, your wall will gain substantial strength and support. Tar Heel Basement Systems can install these systems for you and make the process stress-free.

6. Use a Dehumidifier
In smaller spaces like basements, high humidity levels will quickly cause issues. You might start to notice the space feeling unpleasant or smelling musty as moisture permeates everything inside.
Installing a dehumidifier in your basement helps keep humidity levels low. However, you’ll want to stay away from standard dehumidifiers found in department stores. While they might offer some benefits, they usually aren’t strong enough or large enough to keep the basement 100% dry.
Not to mention, you’ll have to empty the dehumidifier by hand, which can get annoying. Tar Heel has an energy-efficient dehumidifier that not only removes humidity but also purifies the air in your basement. It also has self-draining capabilities and can be connected to your existing drainage for a seamless experience.

Schedule a Free Basement Inspection With Tar Heel Basement Systems
Following these steps will help you address basement moisture issues effectively. At Tar Heel Basement Systems, we provide comprehensive solutions to your basement moisture problems. Contact us today to schedule a free inspection and receive a free estimate for basement waterproofing services. Don’t let basement moisture get the better of you — create a dry and comfortable basement today!
Ted Dryce
Publish Date:
Last Modified Date:
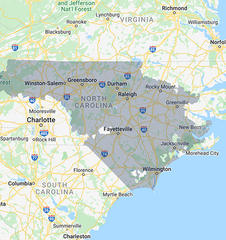
Our Locations
3400 Walsh Pky, Suite 220
Fayetteville, NC 28311
611 Summit Ave, Suite 5
Greensboro, NC 27405
208 Millbrook Rd. Suite C
Raleigh, NC 27609
8005 Knightdale Blvd
Knightdale, NC 27545
2155 Enterprise Dr. NE
Leland, NC 28451
2910 Griffith Rd
Winston-Salem, NC 27103